FAQ
Can you guide me to which size tuilik I should choose?
Our tuilik is made of stretchy neoprene, 4mm thick. You can choose either the same size you would use for other brands or even choose a size smaller to get less pooling of water from too much fabric around you in your kayak. You might have preferences regarding fit of course but the sizes are physically about 1,5-2cm taller cut per size.
Think of the sizes approximately like the below:
- >190cm = size XL
- >180cm = size L
- 165-180cm = size M
- <165cm (<170 women) = size S
Does your tuilik fit my keyhole cockpit?
Kind of. Currently, our tuilik can stretch over a small keyhole cockpit but we have not tried it extensively. We are working on two tracks: one is to make an exclusive keyhole cockpit model and one where we make a few adjustments and make the base model cover both cockpits well. Stay tuned!
Does your tuilik fit my small Naja’s cockpit
Yes. The bottom tube’s material is a stretchy rubberized fabric which can be shrunk with tying the bungee shorter. In making the jacket, the Rebel Naja was one of our test kayaks.
What is the cost of your tuilik?
The introductory price at the beginning of summer 2025 is USD/EUR 4300 + shipping.
This will change during the summer because of market interest. We ship worldwide but since we’re a small company, the rates might be more than your average shopping experience. However, we will search for the lowest possible shipping rates depending on your needs.
What tools do I need for kayak building?
Being minimalistic but modern, you would only need a hand saw, knife, drill and a screw driver. Although a knife, small hatchet and a hand drill would also suffice. For bending wood you would need a fire. You don’t really need a steaming device, just the heat. It is pretty convenient to attach a pipe to your teapot and build a steambox though. It also makes for a more consistent result without so much guesswork. A hand held electric saw for ripping wood will come in handy. A cheap one will do the job.
For easier and possibly more accurate building if you’re not a craftsperson, you would also need:
- band saw
- table saw
- electric planer (elhyvel)
- plunge router (överhandsfräs)
- electric drill/screwdriver
- shallow angle hand planer (the smaller one hand version)
What wood for kayak building?
There are many options and materials to work with. The best for you might not be the best for someone else. What do you appreciate the most in a kayak? Is it durability in large waves and rock-gardening? Maybe it is lightness for easy lifting on and off your car roof rack? Here is a short list of what to consider:
5m lengts or scarfing? Scarfing takes time and makes for stiffer wood in that region. In my experience it is just as durable. I once read a paper…will link if I find it, that if you stick to a scarfing angle ratio of 1:12 or more, you will reach the same durability as a non-scarfed piece of wood. I use 1:15.
Is rot in wood a common issue where you paddle (humid, warm air, no dry storage)?
Is your budget small or large?
So, in Sweden generally you would wear out a kayak’s underside before rot ever comes into play. Then Spruce (Gran) or Fir (Furu) might be your cheapest and easiest available choice. Spruce, however, comes with knots (kvist) and will need scarfing. If you would find it knot free, it is fairly light and durable. Fir comes in a wide variety of lengts and widths and you can get it fairly knot free, but it weighs more and for the weight not to increase too much, you will need to thin out every plank of your kayak that uses it. Spruce gunwhales and fir stringers/keel might also be a good option. The rule of thunb is: the thinner the stick, the smaller the knot has to be. The more knots, the less you can thin down your sticks and you will build a heavier kayak.
If you follow many American SOF-builders, they build with Western Red Cedar which is easily available and cheap over there. In Sweden it is 10x as expensive and increases your build costs accordingly. However, it is slightly poisonous, very resistant to rot, light and comes mostly knot free. It is nasty to work with and you will need a mask indoors.
In our building class in -22, we decided on Paulownia grown in Europe, namely Spain. Shipped to Sweden, it is 1/3 of the cost of Red Cedar, lighter, pretty much knot free and a bit less brittle when moist. With Paulownia, you might need to come up a size in thickness for your kayak’s longitudinal beams. Our supplier only ships 3m lengths so you will have to scarf the longitudinal beams. A low volume Greenland rolling kayak will weigh less than 11kg with a Paulownia frame, 240g/m cloth and 3 coats of PU. They might be the lightest you can build with SOF technique without compromising safety.
Which coating for my kayak?
For coating your kayak there are a number of products you can use, but only a few of them make sense putting on your beautiful kayak. This is an investment you should protect, right?
Well, basically you should get a good Polyurethane for concrete floors or boat use. Prices vary in ratio 1:4. It may be one or two component, where you add a hardener. It’s not hard to do but you have to stir thoroughly. You want it to have a potlife of at least 20 minutes, preferrably more. Each layer should settle in a few hours and they should be possible to apply wet-on-wet. If you have to leave them overnight your kayak will take a week to coat on both sides.
For the last few years and about 20 kayaks, including student’s builds, I have used 2 component Polyurethane imported from Marcin Bober in Poland. It works really well, the price is decent and he ships within a few days. Potlife is 40 minutes, the ratios are not so critical and it is fairly easy to apply wet on wet with a roller or spatula, whichever you prefer.
There is bad poisonous stuff and ok poisonous stuff, and others I haven’t tried, which are 3x the price and not good for your health. Some take a week to put on and you WILL need a mask and no other work can be done in your workshop until the fumes settle. That might take more than 12h. Not joking here!
Then there is the good stuff, which takes ages to get and is an unreliable service for us in Europe, to say the least. I have ordered three times from there and waited a total of 5 months… The earth pigment colors I ordered the first time never arrived. No excuse, no refund. BTW, you absolutely need a minimum of 1,5 orders, then pay for shipping and VAT. In total, it doesn’t come cheap. However, the end result is achieved in 2 days and is durable. The caveat is that it goes yellowish with UV after a summer. For my earth toned kayaks, I kind of like it. It will not suit all tastes and colors though. Skinboats’ product might be the nicest to work with regarding fumes.
Then there is the other good stuff from Tikkuriila, which one unfortunately has to buy in big batches and has a potlife of – well, minutes! However, you have to be two people working really, really fast, you have about 3 minutes to wet the cloth through and you have to buy 13kg for your first try. Not ideal.
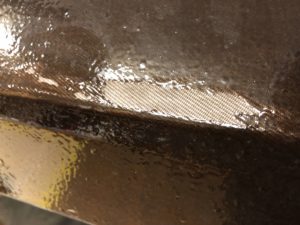
Results of bad, poisenous PU below after a few pool sessions. Not what you want on your brand new baby! And no, I haven’t oiled the stringer too much there 😉
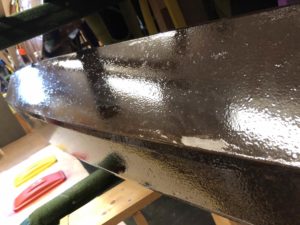
And here is the result of a much better PU compound from @mbober.